Monotype Composition Caster Parts

Some of you who attended the ATF conference in Terra Alta, WV a few years ago may remember my presentation on the ‘Monotype’ Disaster. In short, the first caster I acquired was damaged during shipping. I’ve had it in storage ever since, with the intention of using it as a parts machine. In the mean time I obtained three additional casters – two fully functioning and another for parts. The costs of storing these large machines has finally forced my hand and I will be disassembling it and offering caster parts from the original machine. In fact, the damage to the first caster – though mortal – was restricted to a a very specific area. Most of the late-model british composition caster are in pristine condition.

If you are in need of Monotype Composition Caster parts, please contact me. I am particularly interested in trading parts for composition and display matrices, as well as wedges, stopbars, keybars and other tools of the typecasting trade.

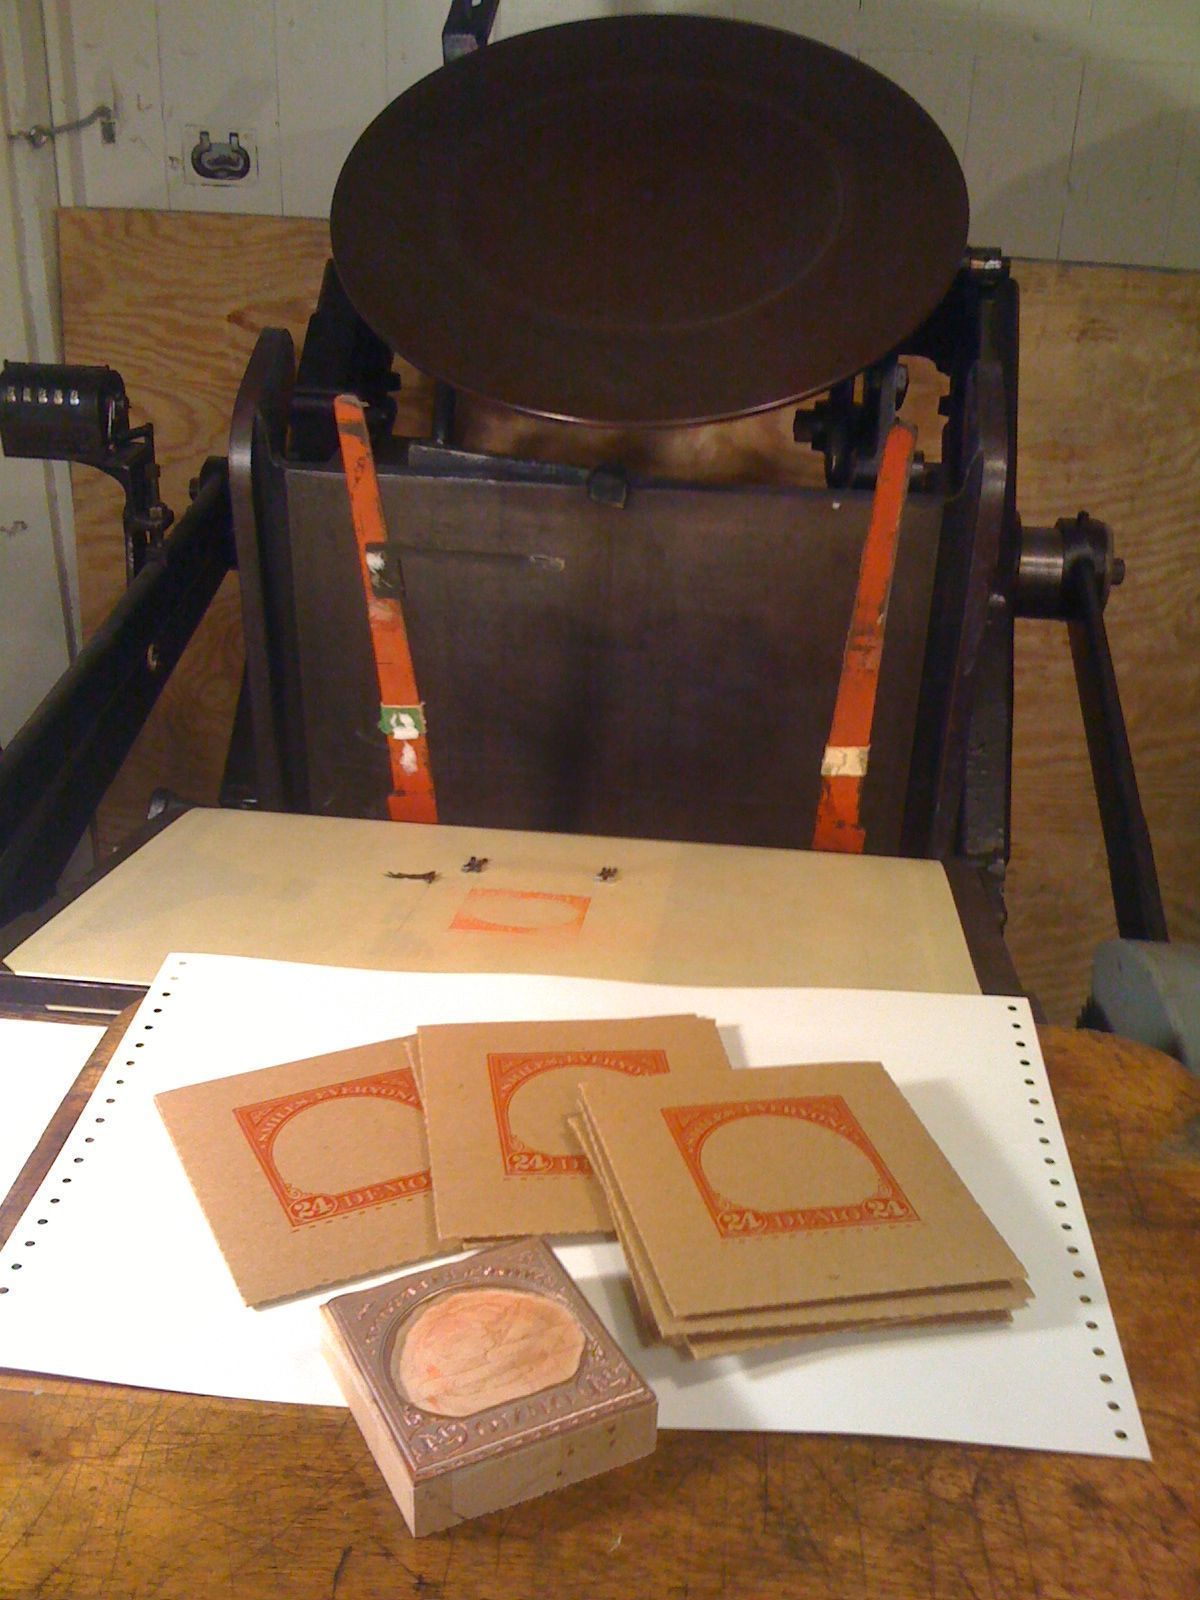
Printing letterpress sleeves for Smiles, Everyone demo CD

Smiles, Everyone Demo CD Sleeves

Keeping with the do-it-yourself approach my band has taken to producing our demo, we’ve opted to print letterpress sleeves for the promo cd. Production is underway here at my print shop in Lititz. Continue reading Printing letterpress sleeves for Smiles, Everyone demo CD

My Band has a New Demo Recording

It took a bit longer to complete than we expected, but my band, Smiles, Everyone, finally has a new eight-song demo. You can listen to it here. We are actively seeking gigs in Philadelphia and Lancaster, PA (and points in between) for the summer and fall of 2009.

If, like us, you crave new, original music, please listen and tell us what you think.

Super Snark Sailboat

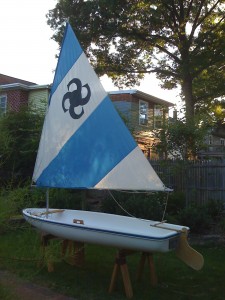
Super Snark Sailboat - Aft port view

I just bought this sailboat, an 11′ Super Snark. I’ve wanted to learn to sail for a few years—this seemed like the perfect sailboat with which to start. It is purportedly unsinkable and very stable. The ABS clad EPS foam hull certainly seems very durable and indeed, could not possibly sink even if completely swamped.

Continue reading Super Snark Sailboat

Bass Rig

Here is my current bass rig for Smiles, Everyone, which includes:

Ampeg Bass Rig

Fender American Deluxe V bass
Humphrey modded Boss CS-3 Compressor
Electroharmonix Big Muff
MXR M-80 DI +
TC Electronic M-350 processor
Ampeg SVT3-Pro amplifier
Switches for amp mute and eq boost, M-300 bypass and tap tempo

I don’t use half of these pedals 90% of the time. Only the compressor and mute are essential. M-300 is for occasional phaser and tremolo. Big Muff is for fun.

Computers

Dan got a new MacBook Pro today. Aaron got an iPhone. Started me thinking about the computers I’ve used or owned over the years.

Prehistory

Coleco Pong – Dad had one at the little house he lived in after my parents divorced. I was maybe 8…or 9 or 10, which would be sometime 1977 – 1979.

Commodore Pet – at Heinz Semder’s import office in Brooklyn. I only really sat in front of it.

Borroughs 68000 – I took a Pascal programming course at Franklin & Marshall when I was in seventh grade. We used terminals (Honeywell or Teledyne?), but I have no idea what the OS was. Once they toured us through the Burroughs 68000 mainframe room. What a cool memory. A roomful of well organized blue refrigerator shapes. Whisking tape machines…and those massive, multiple-platter hard disk machines that were about the size of a dishwasher. Capacity? I don’t know. Each student had a chance to make a punched card—probably with our name.

Mattel Intellivision – Shared it with my step-dad for years.

Commodore Vic-20 – Dad bought this and I started learning BASIC programming. Cool sound chip, simple as it was. 1/4 audio tape storage.

Commodore 64 – My first computer. Awesome sound chip, SID. Programmed in BASIC, Logo, Pascal, broke things in 6510 assembly language. Massive external 5-1/4 floppy drive. Used GEOS for a short time before it finally fried…something in the power supply must have shorted, because when I opened it up, paths on the circuit board were warped and wavy. Melted!

Atari 1200XL – My friend Rick got this for Christmas. Best thing I did on it was write a program to make random geometric shapes. We thought they results would make great OP t-shirts.

Apple Macintosh SE – Borrowed from Casey Dixon, who would later become my wife.Apple Quadra 605 – The first computer I bought on my own.

Apple Quadra 630 – Second computer I bought.

iMac – This was Casey’s.

Apple PowerMac 8200AV

Apple iBook – Casey’s first generation iBook I think.

iMac G4 17″

Apple Powerbook G4 – One of many laptops I used at Ritter. Other machines I used there include Quadra 950 with Daystar accelerator, PowerMac 7200, PowerMac 9500, G3, G4.

Apple Powerbook G4 – 15″ Casey’s last school computer.

Apple iBook xxxx – I’m not sure which one Casey has right now.

Dell Latitude 810 – My Develisys laptop. Ah,…Microsoft Windows. Words cannot express…

iMac 24″ Intel Core Duo – No longer my current machine.

Ampeg V-4B: The All Tube Bass Amplifier

In the last couple of months, Drink the Long Draught has become much more tangible; you might say that we are now a band. With that realization comes a certain amount of excitement and the anticipation of playing live again. Except for the three songs Ant, Nic and I did at Jesse and Tara’s party back in January, it’s been quite a few years for me. In fact, I still have all the same equipment that I had in 1998, when I last played and recorded with The Fontanelles. The time has come to think about some new gear.

This upgrade process really took off when I went to Guitar Center to look for a case for my 1977 Gibson G-3 Grabber. I ended up trying out a bunch of new amp heads, including one of the Ampeg solid state models and the well known, tube driven SVT (model 3 Pro, I think). Ampeg has long had a reputation for exceptional bass tone; and today the company puts a good deal of effort into perpetuating the air of superiority that survives in the bass-playing world. Nonetheless, these amps sound quite good. I left the shop tickled with the idea of Ampeg but discouraged by the high price.

A few days later I found myself in Ken’s Music Center, my local store in Lititz, where I spotted a gorgeous looking Ampeg B-15 from the early 1960s. I asked to play through it, which they kindly obliged. Amazingly warm and solid, but still well defined. That tone, combined with the cunning flip-top design makes this one of the most sought after amplifiers for recording bass. But at only 30 watts—and with a price tag of $1300—I left the shop confused. I want this amp. It is not right for me. Damn.

Enter the Ampeg V-4B also known as Ampeg V4B or Ampeg V4-B

While fretting of the choice of bass amplifier, I found the product review database at Harmony Central to be really helpful for getting an overall impression of the various product lines. I honestly don’t know where I first came across the Ampeg V-4B, but I do remember someone writing that it was the next best thing to the SVT. Not long after that I found one for sale in Philadelphia—a 1973 unit with new power tubes, a new power cord and in rather nice shape for a 35 year-old amp.

The Ampeg V-4B is a two-channel, all-tube, 100-watt beast of an amp head. I weighs a good bit…maybe 70 pounds. Like many electronics of the early and mid 70s, the design of the cabinet and control face is Spartan—black and silver. On the far left are two input jacks. Five knobs in the center of the panel control channel 1 gain, channel 2 gain, treble, mid-range, and bass, respectively. Above the EQ knobs you’ll find three boost switches: High frequency boost; a three-position Mid-range boost that emphasizes 300Hz, 1kHz, and 3kHz; and Bass boost. Finally, on the far right are Standby, Polarity and Power switches, with indicator lights above standby and power.

Having spent several years playing bass through a Hartke 3500, I became accustomed to using—but never entirely happy with—the graphic equalizer. Sure, a graphic EQ is precise, but I tend to spend too much time fiddling with it. With the Ampeg V-4B controls, I find I can ‘dial in’ a very distinct tone in few seconds. The boost switches have a particularly dramatic effect on overall tone.

Around back of the Ampeg V-4B

First thing you notice from the back is that the amp chassis is upside-down, that is, the tube and transformers ‘hang’ down from the chassis/circuit board. I guess this is a fairly common design strategy that allows for, among other advantages, the positioning of the front panel controls near the top of the unit.

The back of the amplifier features two 10k Ohm line outputs, two external speaker outputs and a hum balance potentiometer. Also printed on the rear of the chassis are the tube designations. This unit uses a quartet of 7027 power tubes. I understand that 7027 power tubes were no longer made after some point (mid 1980s?). For that reason, many V4-Bs have been converted to use 6L6 power tubes. My unit was never converted; and the recent re-introduction of 7027 tubes by Sovtek means that this amp should sound as close to Ampeg’s original design as possible. (Barring the use of expensive vintage 7027 tubes).

The pre-amp section of the V4-B employs 2 ECC83/12AX7 tubes, one ECC82/12AU7 tube
, one 12DW7, and a 6K11 tube.

But how does the V-4B sound?

Warm, creamy, and throaty, with a pleasant distortion at high gain. And that’s using my frakencabinet—what once was a Hartke 210 combo, from which I yanked the 3500 head, removed the carpet, cut off the head enclosure, and spray-painted a metallic charcoal. The drivers are missing their dust caps, too. This thing is ugly, but temporary; I’m sure the amp will be much happier with 4 or 6 10s, or 2 10s and a 15. The current set-up is ample for rehearsal.

Ampeg SVT-15E speaker cabinet on the way…

At our last rehearsal, I noticed that I was having a little trouble cutting through the guitar. A few samples of the rehearsal recording bore that out, i.e., it wasn’t just me. I think we all have a tendency to play more aggressively and crank up as we become more comfortable with our material. So it seems my 2×10 cab isn’t going to cut it for rehearsal; it starts to blat (I think then Jesse Lundy term was “shit the bed”) when the V-4B is set somewhere between 4 and 5 on the volume knob. I’d like more control of my tone and also avoid “digging in”, which I am prone to do.

« Here’s the Ampeg bass rig as it appears in July, 2008.

After some dawdling, I decided that I should add a 15-inch cabinet like the Ampeg SVT-15E Classic Series 1×15 Bass Enclosure as the next step toward improving my sound. The band has an outdoor gig coming up at the end of July, and it is time to provide more power and presence. I’ve come very close to buying a new 4×10 bass cabinet, but since I have the 2×10 cab, I’d like to get some more use out of it…I am hopeful the SVT-15E will be the right complement. At 8-ohms and 200 watts, it seems like it should be a good match. And, if I ever need more power, I’ll replace the 2×10 with a 4×10…maybe a Ampeg SVT-410HLF Classic Series 4×10 Bass Enclosure.

A microcosmic music history…

Bands, projects, demo recordings, performances and other audio activities in which I can remember being involved.

Peripatetic 1991
Ian Schaefer 2-track tape, 36in metal ruler, pyrex flask

Superluster 1992-93
Kay Rutherford vox
Ian Schaefer guitar

Antacid 1992-93
Ant Borgesi everything imaginable
Bil Johnson, Ian Schaefer, et al guitars, pots & pans

Luster 1993-94
Kay Rutherford vox
Ian Schaefer guitar
Ryan Johnson bass
Ant Borgesi drums, tape

Rat-a-tat-tat 1994
Ian Schaefer bass, guitar, loops

Skirt 1996-97
Nicola Dixon vox
Jesse Lundy guitar
Ian Schaefer bass
Ant Borgesi drums

The Fontanelles 1997-99
Nicola Dixon vox
Jesse Lundy guitar
Ian Schaefer bass
Ant Borgesi drums
Victor Fiorillo farfisa

The former Expendables/Oyos Negros (precursor to Drink the Long Draught)
Bil Johnson songs and guitars
Ant Borgesi drums and stuff
Ian Schaefer bass and bits
Hear some early tracks on the Drink the Long Draught website

Drink the Long Draught Smiles, Everyone 
Bil Johnson, guitars
Ant Borgesi, drums and things
Nicola Dixon, vox
Ian Schaefer, basses and bits

A Private Press

Nicola Dixon, vox
Ian Schaefer, guitar
Later (2012-13): Stew Bradley, drums; Josh Cusatis, bass

Trio Agave

Gregg Rex Litwin
Stew Bradley
Ian Schaefer

Electives

Ian Schaefer, guitars
Josh Cusatis, Bass
Stew Bradley, Drums

The Second Monotype Caster Project

My first casting session provided mixed results. On one hand, I am ecstatic that I finally made a solid piece of type in my own shop; but, on the other, that same casting session left me somewhat overwhelmed, in particular because the type that I cast did not match the copy that I typed in my first take at the keyboard.

After a good six hours at the machine I had decent type bodies and the machine was running smoothly, but character output was seemingly random! Wrong characters on this scale must be a product of a mismatch of Monotype keybars, keybanks, or stop bars. Perhaps a combination. One thing is clear from the notes that came with the Times New Roman: the mat case layout has ‘evolved’ over its lifetime!

The type I was hoping to compose and cast was Times New Roman, from English matrices at 0.030 drive for American (Lanston) composition machines. Naturally, I had forgotten about the fact that these were 30 thousandths drive, so I cast with a English Constant Height mould. You know what that means, right? It means type that is 0.898 inches height-to-paper, a full 0.020 inches below the standard of 0.918 inches for American and British types. Oops.

With so many complications, it seems wise to attempt something simpler, in hopes of finding a shorter route to sucess. I’ve decided, for my next project, to simplify considerably and cast display type. The type is 14-point Bold Antique, Lanston Monotype #144, a face drawn for ATF in 1904 by Morris Fuller Benton.1 I wanted to cast 14pt because it is the smallest size of display type and with that fact certain concerns associated with casting larger sizes are alleviated. 18pt and 24pt are probably the easiest for me to handle physically—not at all fiddly like smaller types, and you can still hold several words of the type between your thumb and forefinger—but those sizes are a little more intimidating to cast. Bold Antique, as the name indicates, is a very bold, slab serif face. It lacks most of the subtlety, modulation and fine detail you find in a typeface like Centaur, and for this reason, it should pose fewer problems in casting than would a face with sinewy extremities.

I purchased this particular font of mats from Rich Hopkins or Hill & Dale Press & Typefoundy when visiting as a student and Monotype University 5. The dirty old box has a typed paper label which reads “The Kitsilano Times’. I have yet to identify this former, probably newspaper, publisher.

Each Lanston Monotype display matrix shows four numbers on the front of the mat. These are 1) the Monotype Series Number, which identifies the typeface (in this case, No 144 is Bold Antique); 2) the point size; 3) the normal wedge position; 4) and the special justification wedge position. Together, the positions of the two wedges determine the width of the type body setwise, that is, parallel to the reading direction. The table below shows the wedge positions and resulting character widths for each character of 14pt Bold Antique. When casting display type, it is customary and wise to cast all characters of a given width in sequence, then move on to the next widest character. Not only does this approach ensure consistency and precision, is also provides the most efficient process simply because it incurs the fewest adjustments of the caster.

Bold Antique Series No. 144
Lanston Monotype Machine Company
Line Standard: 0.1532 inches
Abutment Screw Packing Piece must be in place for all sizes in this table
Wedge Settings Width2 Characters
.0075 .0005
4 4 .0623 ‘ ; , . : !
5 4 .0761 l i
6 2 .0865 – t
6 4 .0899 ?
6 6 .0934 j
7 2 .1003 f
7 4 .1038 s I
8 2 .1141 z
8 4 .1176 r e c
9 4 .1314 y v
9 6 .1349 o
9 8 .1383 x q p g d b a
10 4 .1453 u n h S J
10 6 .1487 k
10 8 .1522 0 1 2 3 4 5 6 7 8 9 $
11 2 .1556 Z L
11 4 .1591 C
11 6 .1625 T
11 8 .1660 E F
12 6 .1764 V Q P O G
12 8 .1798 Y B
13 4 .1868 w U N D A
13 6 .1902 X R
13 8 .1937 H
14 2 .1971 K
14 8 .2075 &
15 4 .2144 m
15 8 .2213 M
18 2 .2525 W

Today I continued setting up the Monotype Composition Machine for display casting. I have several sources that detail the procedure of switching a comp caster over to display work…for both British and American machines. My 1916 Lanston edition of Casting Machine Adjustments is the most illustrative and breaks the process down into discrete steps.

This is the first time I’ve converted a caster from comp to display. Having completed the process, I am left wondering how difficult it will be to switch it back. While most of the adjustments are very simple 3, adjustments to the pump where a bit trickier for me. I didn’t take notes on previous positions of a few parts, and now that they’ve been adjusted, I cannot precisely reverse those adjustments.

Cast a blank matrix in the 15-8 position. Or maybe 16-8. A wide type…consistent and fairly solid, but with a little flash around the head. I attributed this to matrix wear, but now also believe that the metal was been too hot…720°+, if my auxiliary thermometer is properly calibrated (and it is indeed suspect).

The very first type bodies looked fairly good, well-formed and solid, but they got worse as time passed, first showing small blisters on the sides near the foot. The machine was splashing a good bit and a significant build-up of solidified type metal was forming on the underside of the mould stand. I reviewed the adjustments to pump as described in Casting Machine Adjustments and the later British The Monotype Casting Machine. While fiddling with the pump adjustments I realized that I still do not have a solid understanding of the mechanics of the Monotype pump, particularly when it comes to casting display type.

I put the cap ‘E’ mat in the holder and set the wedges to 11-8, which should result in a type measuring 0.1660 inches, setwise. After a few characters emerged with an overhang on both sides, it was obvious that I had set the wedges incorrectly. Was the gauge reading to be taken on the left edge or the right edge of the transfer wedge operating rod guide? Hmmm.

When I was sure that I has re-set the wedges correctly, I started the machine a cast a few short lines. I could see from the way the characters leaned in the type channel that there was still an overhang on the type. Indeed there was—but this time the overhang was only on one side and there appeared to be enough room on the body to accomodate the entire face and beard of the type. Good news.

From my experience at Monotype University as well as the numerous books I poured over in the last few years I’ve learned a little something about aligning the face of type to the type body. It turns out: I need a serious review! Though I managed to align the type using only the centering pin adjustments, the whole time I felt there was something else I should have adjusted first. More on that later.

Looking at this cap ‘E’ it was clear that the body was now too wide; the actual width 0.1854 inches, not 0.1660 that the 11-8 wedge setting should provide. Could I have set the wedges incorrectly again? As yet, I have not answered this question. In my next trip out to the foundry, I hope to resolve the 0.0194 inch difference in the set width. Something simple.

One final measurement gives some idea of the age and wear of both the type mould and the matrices with which I am casting. The height of the type, or height-to-paper, is a mere 0.9165+/-0.0005! Nominally “type-high” is 0.918 inches. More precisely, the standard is 0.9186 inches4.

References

1. McGrew, Mac. American Metal Typefaces of the Twentieth Century, 2ed., pp 44, 1993, Oak Knoll, New Castle DE.
2. Widths derived from “Display type wedge positioning” in ‘Monotype’ Composition Caster Manual, Volume 2, Part 37, Table 37.4, 1970, The National Committee of Monotype Users’ Associations with The Monotype Corporation Limited, London.
3 e.g. swinging the display gag block into position so that the centering pin lever picks up the transfer wedge shifter up on every cycle of the machine…only type is cast…no spaces.
4From the glossary entry for “height-to-paper” in The Monotype System, Lanston Monotype Machine Company, 1916 Philadelphia.
New Life in the Typefoundry

I’ve made time lately to work on setting up the typefoundry. Quite a lot has happened since the ‘Monotype’ caster from Heritage Letterpress made its way here—though most of the big changes have taken place just since May of this year.

First, I acquired two more ‘Monotype’ casters from former foundry at Woodside Press in Brooklyn NY. One machine—a late model composition machine in very nice shape—is equipped with many of the later attachments including unit shift, unit adding, quadding and centering, plus a display attachment and a lead and rule attachment (all the things Theo Rehak would tell me to throw away!). The second machine is an old-style display caster with the big gear box; it came originally from Mouldtype in the UK.

These two new type casters arrived to a cramped shop, but there would have been no room at all had I not moved out the wrecked Duensing machine, which despite its potential as a display caster will become a source for very fine parts,…at least for now. The first part to come off was the electric pot. I put it on the comp from Heritage in exchange for it’s gas-fired pot. I’m a very glad not to have to deal with gas in this small shop.

With just enough space created and the new machines roughly in position, I turned my attention back to the electricity and the self-contained water cooling system I started building last year.

Photos and more of the story will come shortly…

The electrician came by to wire the motor of one of the new monotype machines and both of the electric pots. He and his assistant also connected two original Monotype work lamps that bolt onto the rear of the machine. Very illuminating…and very authentic looking!

I now have a working version the self-contained water cooling system—I guess you’d call it a prototype. While it is a loose tangle of hoses and copper tubing, the thing does work, that is to say, it moves a controlled flow of water through the caster and type mould. I have not yet tested it in a sustained casting session in order to demonstrate it’s cooling effectiveness. Once proven, I will hopefully find the time to build a compact structure to allow mobility and easy access to the main valves.